In This Blog
- Introduction
- The Assessment Phase
- The Planning Stage
- The Migration Phase
- The Optimization Phase
- Lift and Shift Techniques
- Conclusion
- How Emergent Software Can Help
- Final Thoughts
- Frequently Asked Questions
TL;DR
- A lift and shift migration moves applications to the cloud with minimal changes, but it still requires careful assessment, planning, testing, and optimization.
- The assessment phase determines which applications are good candidates based on compatibility, dependencies, performance needs, security, compliance, and licensing.
- Planning should include environment mapping, Azure resource sizing, network design, migration sequencing, and a clear cutover strategy.
- Migration techniques may include server replication, database migration, network migration, storage migration, testing, cutover planning, and rollback preparation.
- After migration, optimization is critical to improve performance, right-size resources, reduce costs, and identify future modernization opportunities.
Introduction
Our recent blog, Cloud Migration: What is Lift and Shift, focused on the basics of lift and shift: what it is, when to use it, and the benefits and drawbacks of this cloud migration technique. Now, we will get into the details of how you can implement a lift and shift migration for your organization.
A lift and shift migration typically involves several key stages: assessment, planning, migration, and optimization. While the approach is often faster than a full application modernization effort, that does not mean it should be rushed. The goal is to move quickly while still reducing risk, protecting performance, and setting your organization up for long-term success in the cloud.
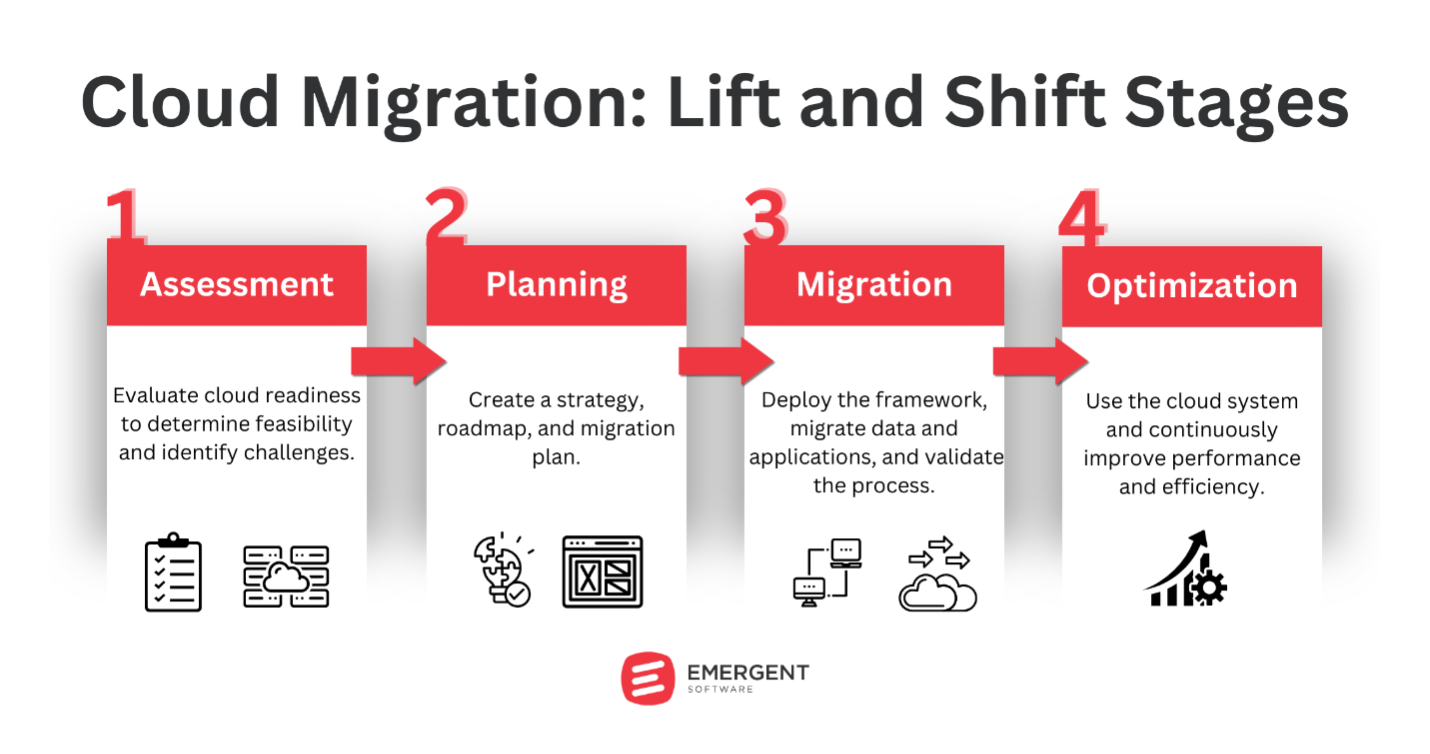
The Assessment Phase
The assessment phase involves evaluating which applications and workloads are viable candidates for a lift and shift move. Not every application is suitable. Some may have dependencies, licensing requirements, hardware needs, or performance constraints that are difficult to replicate in the cloud.
Compatibility is one of the most important considerations. For example, a .NET application running on Windows Server 2012 R2 should generally be able to run on an Azure VM with the same operating system. In that case, lift and shift may be a reasonable option because the cloud environment can closely mirror the current setup.
However, an application that depends on specific hardware or network configurations may be more difficult to migrate as-is. Consider an application that relies on a USB hardware key for licensing. Replicating that setup in Azure could be challenging and may require changes to the application or its licensing model, making it a poor candidate for a simple lift and shift migration.
Performance requirements, security obligations, compliance regulations, and licensing also need to be reviewed. Applications with strict latency requirements or applications that handle sensitive regulated data may require additional planning before they are moved. The goal of this phase is to identify what can move safely, what needs special handling, and what should potentially be modernized instead.
The Planning Stage
Once suitable applications are identified, the next stage is planning the actual migration. This is where the team maps the current environment, chooses the right Azure resources, designs the cloud network, and builds a step-by-step migration plan.
Planning tasks often include:
- Mapping the on-premises environment and dependencies
- Selecting the appropriate Azure VM sizes and storage options
- Designing the Azure virtual network
- Developing a step-by-step migration plan and timeline
- Preparing the Azure environment
For instance, when migrating a SQL Server database to Azure SQL Database, planning tasks would include sizing the Azure SQL Database instance, designing the data migration process, and determining the cutover strategy. Here is an example Azure CLI script for provisioning an Azure SQL Database:
# Create a resource group

az group create --name myResourceGroup --location eastus


# Create a server

az sql server create --name myserver --resource-group myResourceGroup --location eastus --admin-user myadmin --admin-password xxxxxxxx


# Configure a server firewall rule

az sql server firewall-rule create --resource-group myResourceGroup --server myserver -n AllowYourIp --start-ip-address 192.168.0.1 --end-ip-address 192.168.0.1


# Create a database

az sql db create --resource-group myResourceGroup --server myserver --name mydatabase --service-objective S0
Thorough planning is critical to reduce risk and ensure a smooth transition to Azure. The better you understand your dependencies, data flows, network requirements, and operational needs before migration, the fewer surprises you are likely to face during cutover.
The Migration Phase
With the planning complete, the actual migration process can begin. This involves transferring all application components to Azure, including code, configurations, libraries, supporting services, and associated data.
For a typical lift and shift migration, Azure Site Recovery can be used to replicate on-premises virtual machines to Azure virtual machines. This helps preserve the existing application environment while moving it to cloud infrastructure.
Here is an example of how to enable replication for a VMware VM using Azure PowerShell:
# Set the vault context

Set-AzRecoveryServicesAsrVaultContext -Vault $vault


# Get the protection container

$protectionContainer = Get-AzRecoveryServicesAsrProtectionContainer -Fabric $fabric -Name "myProtectionContainer"


# Get the replicatable items

$replicateableItems = Get-AzRecoveryServicesAsrReplicationProtectedItem -ProtectionContainer $protectionContainer


# Start replication

$jobResult = New-AzRecoveryServicesAsrReplicationProtectedItem -VMwareToAzure -ProtectableItem $replicateableItems[0] -Name "myVM" -RecoveryVMName "myVM" -RecoveryResourceGroupId $targetResourceGroup.ResourceId


# Track job status to completion

while (($jobResult.State -eq "InProgress") -or ($jobResult.State -eq "NotStarted")){

    sleep 10;

    $jobResult = Get-AzRecoveryServicesAsrJob -Job $jobResult

}

$jobResult.State
The migration phase should be carefully monitored. Teams need to validate replication status, confirm data consistency, verify access controls, and prepare for cutover. Even with a lift and shift approach, small configuration issues can create significant problems if they are not caught early.
The Optimization Phase
After the application is moved, extensive testing is necessary to validate that it functions as expected in Azure. This includes verifying integrations, performance under load, security controls, and end-to-end business processes. Any issues uncovered during testing should be resolved before the application is fully live in Azure.
Following the move to Azure, there are often opportunities for optimization. This could involve tweaking configurations, right-sizing Azure resources, or integrating selected Azure Platform as a Service offerings where they make sense.
For example, after lifting and shifting a web application to Azure VMs, a company might right-size the VM instances based on actual CPU and memory usage. They could also introduce Azure Autoscale to dynamically adjust the number of VM instances based on traffic.
Here is an example of setting up autoscale for a VM scale set using Azure CLI:
# Create a scale set

az vmss create \

  --resource-group myResourceGroup \

  --name myScaleSet \

  --image UbuntuLTS \

  --upgrade-policy-mode automatic \

  --admin-username azureuser \

  --generate-ssh-keys


# Define an autoscale profile

az monitor autoscale create \

  --resource-group myResourceGroup \

  --resource myScaleSet \

  --resource-type Microsoft.Compute/virtualMachineScaleSets \

  --name autoscale \

  --min-count 2 \

  --max-count 10 \

  --count 2
A team might also offload static content to Azure Blob Storage and deliver it through Azure CDN for better performance and lower hosting costs. These types of improvements can help turn a basic migration into a more efficient cloud environment.
While the lift and shift approach moves applications “as-is,” some modifications are usually necessary for applications to run optimally in Azure. Over time, there may be opportunities for additional refactoring or re-architecting to take advantage of more Azure capabilities.
Lift and Shift Techniques
Executing a successful lift and shift migration involves several key techniques. The exact tools and commands vary based on the source environment, target cloud platform, application architecture, and business requirements, but the core concepts are consistent.
Server Replication
Server replication uses tools to create an exact or near-exact copy of an on-premises server in the cloud. This could involve creating a VM image of the on-premises server and using it to spin up a cloud VM with the same configuration.
# Create a VM image

sudo dd if=/dev/sda of=server_image.img


# Upload the image to the cloud

cloud_provider upload server_image.img


# Create a VM from the image

cloud_provider create_vm --image server_image.img --instance_type large
Database Migration
Database migration involves moving databases to the cloud using backup and restore techniques or database migration services provided by the cloud vendor. The right approach depends on database size, downtime tolerance, platform compatibility, and cutover requirements.
-- Take a backup of the on-premises database

BACKUP DATABASE mydb TO DISK = 'mydb.bak';


-- Restore the backup in the cloud

RESTORE DATABASE mydb FROM DISK = 'mydb.bak';
Network Migration
Network migration involves configuring cloud networks to mirror or extend on-premises networks. This could include setting up a VPN connection between the on-premises network and cloud network or configuring cloud network settings to match on-premises routing and security requirements.
# Create a virtual network

cloud_provider create_network --cidr 10.0.0.0/16


# Create a VPN gateway

cloud_provider create_vpn_gateway --network my_network


# Configure on-premises VPN device to connect to cloud VPN

on_premises_vpn_device config --peer cloud_vpn_gateway
Storage Migration
Storage migration involves moving application data to cloud storage services. This may include syncing files to cloud storage, migrating blob data, or setting up file shares in the cloud.
# Sync files to cloud storage

cloud_provider sync /path/to/files storage://my_bucket/files


# Migrate blob data

for blob in $(on_premises_blob_store list); do

  on_premises_blob_store get $blob | cloud_provider storage put mycontainer/$blob

done
Testing and Validation
Testing and validation verify that the migrated application functions as expected in the cloud. This includes testing application functionality, performance, integrations, authentication, security, and end-to-end business processes.
# Perform a load test

load_test --url http://migrated-app.cloud --users 1000 --duration 1h


# Validate application output

actual_output=$(curl http://migrated-app.cloud/api/test)

expected_output="Hello, World!"

if [[ "$actual_output" != "$expected_output" ]]; then

  echo "Validation failed: expected '$expected_output', got '$actual_output'"

  exit 1

fi
Cutover Strategies
Cutover strategies define how user traffic is directed from the on-premises application to the cloud application. This could involve updating DNS records, configuring load balancers, or using a traffic management service.
# Update DNS to point to cloud application

dns_provider update_record --name myapp --type A --value cloud_app_ip


# Configure load balancer

cloud_provider create_load_balancer --name myapp_lb --vms vm1,vm2,vm3
Rollback Planning
Rollback planning prepares the team to revert back to the on-premises application if issues are encountered during migration. This might involve keeping the on-premises application running in read-only mode during the migration or having a process to sync data back from the cloud to on-premises.
# Sync data back from cloud to on-premises

cloud_provider storage get mycontainer/data | on_premises_data_store write data


# Repoint DNS to on-premises application

dns_provider update_record --name myapp --type A --value on_premises_app_ip
You May Also Like: What is the Microsoft Cloud Adoption Framework and Why is it Important?
Conclusion
These are just some examples of the techniques involved in a lift and shift migration. The specific tools and commands will vary based on the source environment, target cloud platform, and application architecture. The key is to have a well-planned and tested process for each stage of the migration.
If you need help with your lift and shift cloud migration, please contact our team at Emergent Software and we will be happy to help.
How Emergent Software Can Help
We help organizations plan, execute, and optimize cloud migrations with a practical approach that fits their goals and constraints. Whether you are moving workloads to Azure through lift and shift, modernizing applications over time, or improving cloud performance after migration, our team brings experience across Azure cloud services, custom software development, data engineering, and DevOps. If this sounds familiar, we can help.
Final Thoughts
A lift and shift migration can be a smart way to move quickly, reduce data center dependency, and begin taking advantage of cloud infrastructure. But even though the application may move “as-is,” the process still requires careful assessment, planning, migration execution, testing, and post-migration optimization.
The strongest lift and shift migrations are not treated as one-time moves. They create a foundation for future improvement. Once your applications are stable in Azure, you can look for opportunities to right-size resources, improve performance, reduce costs, and modernize high-value parts of the environment.
If you're ready to implement a lift and shift migration with a clear plan and long-term strategy, Emergent Software is here to help. Reach out — we'd love to learn more about your goals.
Frequently Asked Questions
What is lift and shift in AWS?
Lift and shift in AWS involves migrating applications and workloads from an on-premises environment to AWS without making major changes to the applications themselves. This approach typically uses services like Amazon EC2 for compute, Amazon S3 for storage, and AWS Direct Connect or VPN for networking. The goal is to recreate the existing environment in the cloud as closely as possible. It can be useful when an organization needs to move quickly or exit a data center. After migration, teams can decide whether to optimize the workload using more cloud-native AWS services.
What is the opposite of lift and shift?
The opposite of lift and shift is a full re-architecture or refactoring effort. Instead of moving the application as-is, the team redesigns or rewrites it to take full advantage of cloud-native services. This may include breaking a monolithic application into microservices, moving to serverless compute, or changing the data architecture. Re-architecture usually requires more time and investment, but it can deliver greater scalability, resilience, and cost optimization. The right choice depends on business goals, timelines, and technical requirements.
What is the difference between lift and shift and SaaS?
Lift and shift involves moving an existing application to the cloud with minimal changes, usually by recreating the current infrastructure in a cloud environment. SaaS, or Software as a Service, means using a third-party cloud-based application that is fully managed by the provider. With lift and shift, your organization still owns and manages the application and much of its configuration. With SaaS, the provider handles the application, infrastructure, updates, and maintenance. The choice depends on whether you need to keep a custom application or can replace it with a managed product.
What are the benefits of the lift and shift approach?
Lift and shift offers several benefits, including speed, lower migration complexity, and reduced upfront risk. It allows organizations to move applications to the cloud without waiting for a full redesign or rewrite. This can help with data center exits, aging infrastructure, and urgent cloud migration deadlines. It can also create a foundation for future optimization once the workload is running in the cloud. While it may not unlock every cloud-native benefit immediately, it can be a practical first step.
What is lift and shift?
Lift and shift, also known as rehosting, is a cloud migration strategy where applications and workloads are moved from an on-premises environment to the cloud with little to no modification. The goal is to preserve the existing architecture and functionality while changing the hosting environment. This is often done using virtual machines, replicated servers, or cloud infrastructure that closely matches the original setup. It is usually faster than refactoring or rebuilding. However, it may require later optimization to get the full value of the cloud.
What is lift and shift vs. refactor?
Lift and shift moves an application to the cloud with minimal changes, while refactoring modifies the application to better use cloud-native features and services. Lift and shift is usually faster and lower risk upfront because it preserves the existing architecture. Refactoring takes more effort but can improve scalability, performance, resilience, and cost efficiency. Many organizations start with lift and shift, then refactor selected parts of the application later. The best approach depends on whether speed or long-term optimization is the higher priority.