
In This Blog
TL;DR
SSIS Data Flow Task performance can improve significantly when you tune buffer and destination settings instead of relying on defaults.
Key Data Flow Task properties include AutoAdjustBufferSize, DefaultBufferMaxRows, and DefaultBufferSize.
Key OLE DB Destination settings include Rows per batch and Maximum insert commit size.
In this demo, changing buffer and commit settings improved a 10 million row load from just over two minutes to 44 seconds.
Over-tuning can make performance worse or cause memory issues, so benchmarking before and after changes is essential.
Introduction
Working on a data engineering team, I am often asked to troubleshoot SSIS (SQL Server Integration Services) Data Flow performance issues. The usual suspects include poorly written queries, missing indexes, and inefficient package design. For example, using SELECT * on a table with hundreds of columns when you only need three of them is going to create unnecessary overhead. So will sorting 80 million rows before loading them into a staging table if that sort is not truly needed.
One area that does not always get enough attention is the configuration of the Data Flow Task and OLE DB Destination properties. This blog focuses specifically on the Data Flow properties AutoAdjustBufferSize, DefaultBufferMaxRows, and DefaultBufferSize, along with the OLE DB Destination properties Rows per batch and Maximum insert commit size.
There are several articles that explain what these values are, but fewer that walk through how to find practical values in a real test. As with most SQL Server performance tuning work, the answer is “it depends.” The goal here is to give you a clear starting point and show how different settings can affect performance.
Environment Setup
To simulate a realistic and slightly constrained environment, I set up a Windows 10 virtual machine with 2 cores and 8 GB of memory. I used SQL Server 2019 CU18 and Visual Studio Enterprise 2019. SQL Server was installed with default settings, and everything ran on the C: drive, including the database data and log files.
This setup is not ideal for production, but that is the point. A constrained environment makes it easier to highlight the effect of tuning changes without needing a large infrastructure footprint. It also kept the demo within my $150 development subscription budget.
Creating Source and Destination Databases
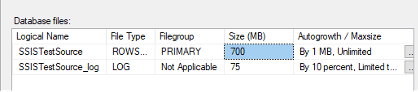
Using the following scripts, I created the source and destination databases, then created a Customer table with 10 million rows of random data from master.dbo.spt_values. Between SSIS package executions, I dropped and recreated the destination database and table to keep each test consistent.
USE master;

/* Create source and destination databases */
CREATE DATABASE SSISTestSource;
ALTER DATABASE SSISTestSource SET RECOVERY SIMPLE WITH NO_WAIT;

CREATE DATABASE SSISTestDestination;
ALTER DATABASE SSISTestDestination SET RECOVERY SIMPLE WITH NO_WAIT;

/* Create source table */
USE SSISTestSource;

CREATE TABLE dbo.CustomerSource
(
    CustomerSourceId int IDENTITY(1, 1),
    FirstName nvarchar(50) NOT NULL,
    LastName nvarchar(50) NOT NULL,
    CONSTRAINT CustomerSource_CustomerSourceId PRIMARY KEY CLUSTERED (CustomerSourceId ASC),
);

/* Insert 10 million rows in batches of 100,000.
   Credit to Jonathan Kehayias for this script. */
INSERT dbo.CustomerSource
(
    FirstName,
    LastName
)
SELECT TOP (100000)
    a.name,
    b.name
FROM master.dbo.spt_values AS a
CROSS JOIN master.dbo.spt_values AS b
WHERE a.name IS NOT NULL
AND b.name IS NOT NULL
ORDER BY NEWID();
GO 100

/* Note: This finished in 58 seconds */

/* Create destination table */
USE SSISTestDestination;

CREATE TABLE dbo.CustomerDestination
(
    CustomerDestinationId int IDENTITY(1, 1),
    FirstName nvarchar(50) NOT NULL,
    LastName nvarchar(50) NOT NULL,
    CONSTRAINT CustomerDestination_CustomerDestinationId PRIMARY KEY CLUSTERED (CustomerDestinationId ASC),
);
Creating the SSIS Package
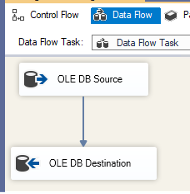
Next, I created an SSIS package with a Data Flow Task to transfer data from dbo.CustomerSource to dbo.CustomerDestination. This involved adding an OLE DB Source and an OLE DB Destination in the Data Flow, connecting them, and configuring the connection managers.
If you are reading this, you likely already know the basics of creating an SSIS package, so we can move on to the more useful part: tuning and testing the package.
Identifying Performance Bottlenecks
The initial data flow consisted of an OLE DB Source and an OLE DB Destination. I used the Table or view access mode and left everything else at the default values.

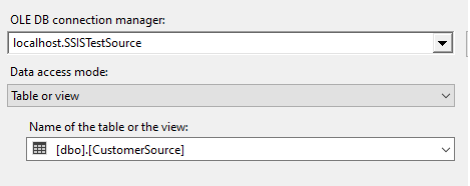

The screenshots above probably look familiar. What is often overlooked, though, is the Data Flow Task properties themselves. An important distinction is that Data Flow Task properties apply to the entire data flow, while multiple OLE DB Destinations inside a single data flow can be configured independently.
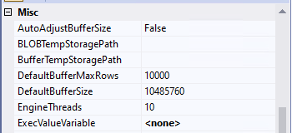
Exploring Data Flow Task Properties
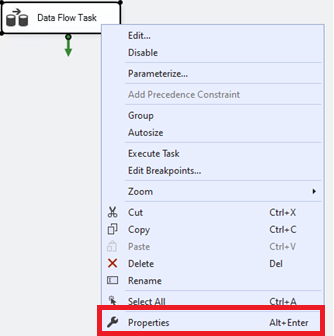
If you are having trouble finding these values, go to the Control Flow, right-click your Data Flow Task, and select Properties.
Let the Tests Begin
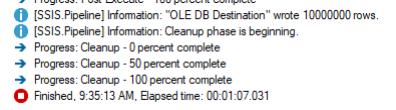
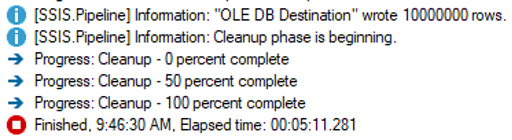
For the first test, I executed the package using all default settings. Here was the result:
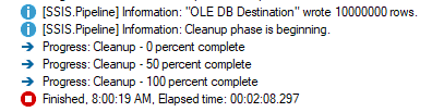
Just over two minutes to load 10 million rows is not terrible. However, if the two databases exist on the same server, I would typically tell a client there is no need to pull the data into SSIS and push it back out through a Data Flow Task. SQL Server can do that work directly.
So, what happens if we use a SQL script to transfer the rows instead?
Comparing SSIS with a T-SQL Approach
USE SSISTestDestination;
INSERT INTO dbo.CustomerDestination (FirstName, LastName)
SELECT FirstName, LastName
FROM SSISTestSource.dbo.CustomerSource
ORDER BY CustomerSourceID;
/* SQL Server Execution Times:
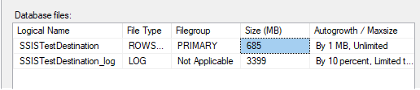
CPU time = 17687 ms, elapsed time = 78954 ms. */That is one minute and eight seconds when we let SQL Server do the heavy lifting. However, it is important to note that this inserted 10 million rows in a single transaction, which caused the transaction log to grow. When the source table was loaded in batches of 100,000, the transaction log only grew to 75 MB. Loading the entire table in one batch made the log file grow to 3399 MB. If you use this approach, make sure your log drive has enough capacity.
If this were a client’s package, I would likely recommend putting the logic directly into a SQL Agent Job as a T-SQL command. If SSIS were absolutely necessary, I would recommend using an Execute SQL Task. However, this is a demo on tuning Data Flow Tasks, so the goal is to get the SSIS package as close as possible to the 78 second benchmark.
During package execution, I saw a warning that the CustomerSourceId column was not used in the data flow:
[SSIS.Pipeline] Warning: The output column "CustomerSourceId" (36) on output "OLE DB Source Output" (35) and component "OLE DB Source" (24) is not subsequently used in the Data Flow task. Removing this unused output column can increase Data Flow task performance.
There is another Data Flow property called RunInOptimizedMode, which improves performance by removing unused columns, outputs, and components from the data flow. Even so, the better practice is to remove unused columns at the source. In this example, that means deselecting the unused column in the OLE DB Source.

Applying Optimization Techniques
Tuning Data Flow Task Properties
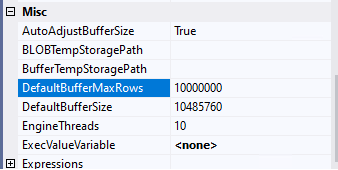
Next, I looked at the Data Flow Task properties. The default setting for DefaultBufferMaxRows is 10,000, and the default DefaultBufferSize is 10 MB. SSIS will load 10,000 rows into its buffer, or 10 MB, whichever comes first.
This package is loading two columns, each with the data type nvarchar(50). The size of nvarchar is 2 * n bytes, so if we calculate 2 columns * (50 * 2) * 10,000 rows, we end up with an estimate of about 2 MB per buffer.
As a reminder, SQL Server is using 4 GB of memory in this test environment, which leaves 4 GB for the operating system, Visual Studio, and other background processes. While the SSIS package will not be able to use the full 4 GB, it should be able to allocate more than 2 MB.
If you look back at the initial customer table load, it completed in 58 seconds using batches of 100,000 rows. We can update DefaultBufferMaxRows to 100,000, but then we hit the DefaultBufferSize cap. You could increase that value manually, or set AutoAdjustBufferSize to True so SSIS automatically calculates the buffer size and overrides DefaultBufferSize. I chose the latter so I would not need to keep recalculating the buffer size as I made adjustments.
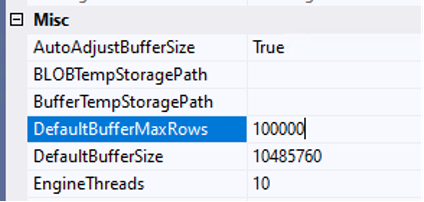
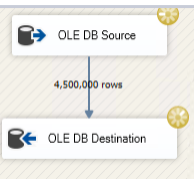
To recap, I removed CustomerSourceId from the data flow source, set AutoAdjustBufferSize to True, and set DefaultBufferMaxRows to 100,000. I ran the package again, and shazam:
Serious progress has been made. Whether or not the three second difference between the SSIS package and the SQL query is statistically significant, the 47 second improvement from tuning the Data Flow Task certainly is.
That raises an obvious question: if setting DefaultBufferMaxRows to 100,000 is good, does that mean setting it to 10,000,000 is 100 times better? No. Definitely not.
Error: A buffer failed while allocating 2147483448 bytes.
Error: The system reports 56 percent memory load. There are 8589463552 bytes of physical memory with 3698368512 bytes free. There are 4294836224 bytes of virtual memory with 4031754240 bytes free. The paging file has 9931640832 bytes with 3992477696 bytes free.
Information: Buffer manager allocated 0 megabyte(s) in 0 physical buffer(s).
[SSIS.Pipeline] Error: The Data Flow task failed to create a buffer to call PrimeOutput for output "OLE DB Source" (24) on component "OLE DB Source Output" (35). This error usually occurs due to an out-of-memory condition.
At some point, you are going to run out of resources. On my test system, 10 million rows was way too high.
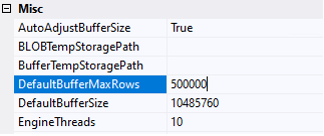
So, what about 500,000 rows?
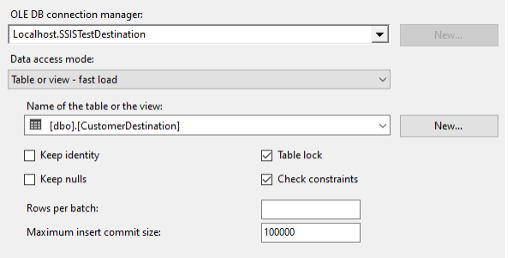
Advanced Settings in OLE DB Destination
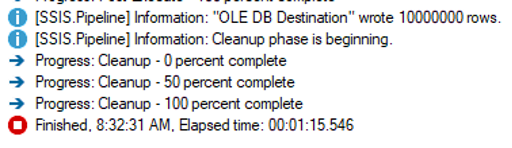
Things keep getting better, but we still have not tuned the OLE DB Destination. The default Maximum insert commit size of 2147483647 attempts to load all rows in a single commit. What happens if we tell the OLE DB Destination that it will receive records in batches of 500,000, but we only want to commit 100,000 at a time?
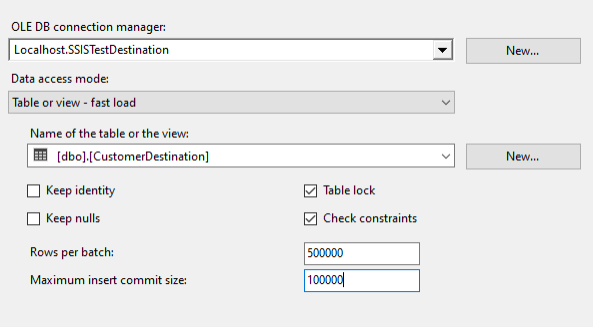
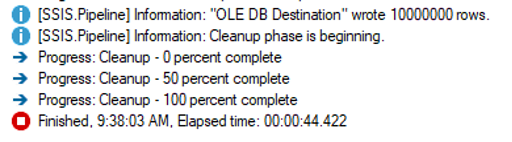
The result was 44 seconds, a full half minute faster than the SQL script. How is that possible? My guess is that it has to do with either the ORDER BY, or more likely, the fact that the SQL script committed all 10 million rows in a single transaction. More testing could be done to fine-tune the SQL statement, but this article is focused on SSIS.
Now that the SSIS package is running at impressive speed, can we still get the settings wrong? Absolutely. Let’s look at what happens if we accidentally set Maximum insert commit size to 1,000 instead of 100,000.
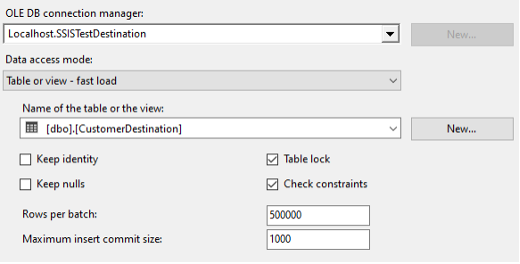
That pushed the same record set to more than five minutes. This is why benchmarks matter. “It seems faster” or “everything is slow” is not useful when performance tuning. You need before and after measurements.
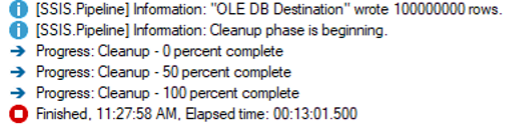
The final test was to see what happened with a larger dataset. I ran the same query to load the dbo.CustomerSource table 900 more times, giving us a total of 100 million records. I reverted the SSIS package to all defaults and got this result:
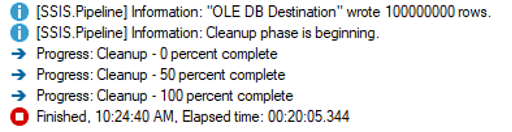
This was expected. Ten times more rows took roughly ten times more time. Then I set everything back to the “optimal” values from the 10 million row example.
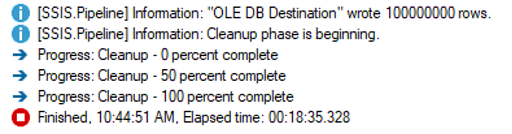
I expected better than a 90 second improvement, so I checked the execution log and found hundreds of errors like this:
Information: The buffer manager failed a memory allocation call for 108000000 bytes, but was unable to swap out any buffers to relieve memory pressure. 14 buffers were considered and 14 were locked. Either not enough memory is available to the pipeline because not enough are installed, other processes were using it, or too many buffers are locked.
Information: Buffer manager allocated 309 megabyte(s) in 3 physical buffer(s).
So, I reduced the batch size to 250,000.

This was closer to what I expected, though I still received a handful of memory allocation errors.
Information: The buffer manager failed a memory allocation call for 54000000 bytes, but was unable to swap out any buffers to relieve memory pressure. 14 buffers were considered and 14 were locked. Either not enough memory is available to the pipeline because not enough are installed, other processes were using it, or too many buffers are locked.
Information: Buffer manager allocated 52 megabyte(s) in 1 physical buffer(s).
Still scratching my head, I wondered what would happen if I did not specify a batch size in the OLE DB Destination and let SSIS handle it.
This finished successfully, nine minutes faster than the default settings, with no error messages. However, it was still more than ten times longer than the fastest 10 million row example, so there are more adjustments that could be made. I’ll save those for another day.
Key Tips and Best Practices
Some key takeaways from this demo are:
Serious performance gains can be made by adjusting the default SSIS package settings.
Your settings may need to change as your data changes.
Adjusting defaults can make things much worse, so collect benchmark statistics before making changes.
Some other considerations for these settings include:
How much memory is available for SSIS?
Is SSIS running on the same server as the SQL data?
Are other applications running, such as SSRS or SSAS?
Do you have one SSIS package running at a time, or are multiple SQL Agent jobs executing multiple SSIS packages simultaneously?
Does your SSIS package have multiple data flows running in parallel?
Does your Data Flow Task have multiple OLE DB Sources or Destinations?
Could this be premature optimization?
Keep in mind that performance is a feature, not a test.
Additional Testing
Some additional tests you may want to try include:
Different Rows per batch settings
Different commit sizes
Setting
DefaultBufferSizeto a value calculated from your row size, or using it to cap memory used by the data flowDisabling
AutoAdjustBufferSizeand manually testing buffer valuesEnabling logging at the package or data flow level
Using Performance Monitor to track SSIS resource usage
Trying SSIS Scale Out and comparing the results
Too much information? Still not sure where to start? Try this:
Go into SQL Agent and record how long the package normally takes.
In Data Flow Task properties, enable
AutoAdjustBufferSizeand setDefaultBufferMaxRowsto 50,000.In the OLE DB Destination, set
Maximum insert commit sizeto 100,000.Deploy the package and execute it, recording how long it takes to run.
Rollback your changes if performance gets significantly worse. Adjust as needed.
Additional Resources
Microsoft Documentation:
Want to improve your SSIS performance? We can help. Get in touch with an expert.
How Emergent Software Can Help
We help organizations improve SQL Server, SSIS, and broader data engineering performance through practical analysis and tuning. Our team works across ETL development, SQL Server optimization, Azure data platforms, and DevOps practices to help data systems run faster, more reliably, and with fewer surprises. If this sounds familiar, we can help.
Final Thoughts
SSIS performance tuning is not about finding one perfect setting. It is about understanding how your package moves data, measuring what is actually happening, and making informed adjustments based on real results. In this demo, small changes to buffer and commit settings made a major difference, but the same values did not behave the same way at every data volume.
That is why benchmarking matters. Before changing package settings, capture current execution times and resource behavior. Then make one or two changes at a time so you can tell what actually helped and what made things worse.
If you're ready to improve your SSIS performance and build more reliable data pipelines, Emergent Software is here to help. Reach out — we'd love to learn more about your goals.
Frequently Asked Questions
How do you improve the performance of Data Flow Tasks in SSIS?
To improve SSIS Data Flow Task performance, start by removing unnecessary columns and avoiding expensive transformations when they are not needed. Then review Data Flow Task properties such as AutoAdjustBufferSize, DefaultBufferMaxRows, and DefaultBufferSize. You should also tune OLE DB Destination settings like Rows per batch and Maximum insert commit size. The right values depend on your available memory, row size, package design, and data volume. Always benchmark before and after changes so you can confirm whether performance actually improved.
How do you make SSIS faster?
Making SSIS faster usually requires a combination of query tuning, indexing, package design improvements, and property tuning. Start with the source query and make sure you are only selecting the columns you need. Avoid unnecessary sorts, blocking transformations, and excessive data movement. Then tune buffer and commit settings to better match your workload. In some cases, a direct T-SQL operation or Execute SQL Task may be faster than a Data Flow Task, especially when moving data between tables on the same server.
Which SSIS transformation performs best?
The best-performing transformation depends on the use case, but non-blocking and partially blocking transformations typically perform better than fully blocking ones. Fully blocking transformations, such as Sort and Aggregate, must receive all rows before they can output data, which can slow down the pipeline. Transformations that operate efficiently in memory, such as Lookup with proper caching, can perform well when configured correctly. The key is to understand how each transformation affects the data flow. If a transformation is not required, removing it is often the best performance improvement.
What is the primary purpose of the Data Flow Task in SSIS?
The primary purpose of the Data Flow Task is to extract, transform, and load data between sources and destinations. It is the part of an SSIS package where rows move through a pipeline and can be modified, cleaned, combined, or redirected. Data Flow Tasks are useful for complex ETL workflows where data needs more than a simple copy operation. They support a wide range of sources, destinations, and transformations. However, they should be designed carefully because poor configuration can create performance bottlenecks.
Can a SQL script be faster than SSIS for data transfer?
Yes, a SQL script can be faster than SSIS in some scenarios, especially when transferring data between tables on the same SQL Server instance. In those cases, SQL Server can move data internally without the overhead of pulling it through an SSIS data flow. However, large single-transaction inserts can cause transaction log growth, so batch size and logging behavior still matter. SSIS becomes more useful when you need transformations, multiple sources, complex workflows, or external destinations. The right choice depends on the job you are trying to accomplish.
What should you consider when optimizing SSIS packages?
When optimizing SSIS packages, consider available memory, server configuration, package concurrency, data volume, and row size. You also need to know whether SSIS is running on the same server as SQL Server or competing with other services like SSRS or SSAS. Multiple packages or parallel data flows can change how much memory is available to each pipeline. It is also important to review whether the package design itself is creating unnecessary work. Performance tuning should be measured, incremental, and based on real benchmarks instead of assumptions.
Author


Let’s Start Building Together
Whether you're modernizing legacy apps, strengthening your cloud security, or planning your next big initiative, Emergent Software is here to help.